When your computer throws an "I/O device error" message, it's more than just an annoying pop-up; it's a critical signal. This message means your PC is struggling to communicate with a storage drive – be it your trusty internal hard disk (HDD), a speedy Solid State Drive (SSD), or even a humble USB stick. Essentially, it can't read data from or write data to the device, making your files inaccessible and potentially jeopardizing your data. The good news? Often, these errors are fixable, and your data might be perfectly recoverable.
This guide is your comprehensive roadmap for Resolving I/O Errors in Storage Devices (HDD, SSD, USB), designed to demystify the problem and empower you with practical, step-by-step solutions. We'll explore everything from simple cable checks to more advanced diagnostic and repair techniques, always prioritizing your data's safety.
At a Glance: Your I/O Error Checklist
- Data First: Always prioritize data recovery before attempting any fixes that might erase your drive.
- Start Simple: Begin with the least invasive solutions like restarting and checking cables.
- Driver Deep Dive: Outdated or corrupted drivers are a common culprit; know how to update or reinstall them.
- System Integrity: Use built-in Windows tools to fix corrupted system files.
- S.M.A.R.T. Is Smart: Learn to check your drive's health status – it’s a crucial indicator of impending failure.
- Last Resorts: Understand when to initialize or format, and when it's simply time to replace the drive.
- Prevention: Regular backups are your best defense against data loss.
Unpacking the "I/O Device Error" Mystery
An I/O (Input/Output) error typically indicates a breakdown in communication. Your operating system, usually Windows, tries to perform an operation – like opening a file, saving a document, or even just booting up – but the storage device isn't responding correctly. This can manifest in various ways: a drive appearing as "RAW" (unformatted), becoming inaccessible, or preventing your system from booting altogether. It's like trying to talk on a faulty phone line; the message just isn't getting through.
Why Your Drive is Giving You the Silent Treatment: Common Causes
Understanding the root cause is half the battle. While the error message is generic, the underlying issues can range from simple glitches to severe hardware failures. Here's a breakdown of the usual suspects:
- Connection Catastrophes: Loose, damaged, or poorly connected cables (SATA for internal drives, USB for external/flash drives) are surprisingly common culprits. A faulty port on your PC can also interrupt data flow.
- Driver Dilemmas: Your operating system relies on specific drivers to communicate with hardware. If these disk drivers are outdated, missing, corrupted, or incompatible, Windows can't talk to your storage device effectively.
- Physical Pains: Storage devices, like any piece of hardware, can suffer physical damage. This could be due to wear and tear, excessive heat, accidental water exposure, or physical shock (like dropping an external drive). Even new disks can sometimes have manufacturing defects.
- File System Foul-Ups: A sudden power loss, an abrupt system crash, or improperly ejecting a USB drive can scramble the file system, making it appear as "RAW" or unreadable to your computer.
- Bad Sectors: Critical areas on your disk can become unreadable due to physical damage or magnetic deterioration. If too many sectors go bad, especially in crucial areas, the entire disk might become inaccessible.
- Unformatted Fiascos: Sometimes, a brand-new disk wasn't properly initialized or formatted, or a formatted one somehow lost its partition information, leading to a RAW status.
- Drive Demise: All hardware has a lifespan. Old or failing HDDs, SSDs, or USB devices can simply stop working reliably, leading to I/O errors as they struggle to perform basic operations.
- Corrupted System Files: Less directly related to the drive itself, but corrupted Windows system files can interfere with how your OS interacts with all hardware, including storage devices.
Before You Fix, Recover: Safeguarding Your Precious Data
This is arguably the most crucial step. Before you attempt any fix, especially those involving formatting or initializing, you must try to recover your data. Many fixes will erase everything on the drive, turning a recoverable situation into permanent data loss.
When is Data Recovery Possible?
If your disk still shows its correct storage size in Windows Disk Management, even if it's not recognized in File Explorer or appears as "RAW," there's a good chance your data is still there, just inaccessible.
The Safest Recovery Strategy: Disk Imaging
The best and safest approach to data recovery from a failing or problematic drive is to create a byte-for-byte copy (a "disk image") of the entire drive first. This way, you work with a copy, minimizing further stress on the potentially failing original drive.
Here’s a general workflow using a data recovery tool (specific steps may vary slightly by software):
- Prepare a Safe Destination: Ensure you have another storage device with enough free space to hold the entire contents of your problematic drive.
- Create a Byte-for-Byte Image: Most reputable data recovery software offers a "Create Image," "Byte-to-byte Backup," or "Disk Copy" feature. Select your problematic drive as the source and your safe destination drive as the target. This creates an exact, sector-by-sector replica.
- Attach the Image (Virtual Drive): Once the image is created, use your recovery software to "attach" or "mount" this image file. It will often appear as a virtual drive within the recovery program.
- Scan for Lost Data: Select the attached disk image (not the original physical drive) and initiate a "Search for Lost Data," "Universal Scan," or "Deep Scan." This comprehensive scan will scour the image for all recoverable files.
- Review, Filter, and Recover:
- Carefully review the files the software finds. Many tools allow you to filter by file type (documents, photos, videos) and preview files to ensure they're intact.
- Select all the files you wish to recover.
- Crucially, recover these files to a different, safe location – never back to the source drive or its image. This prevents overwriting existing data and ensures safety.
This methodical approach minimizes the risk of further damage to your original drive and maximizes your chances of getting your data back.
Step-by-Step Troubleshooting: Fixing I/O Errors
Now that your data is safe, or if you're confident there's nothing critical to lose, it's time to troubleshoot. Always start with the simplest, least invasive solutions first.
1. The Classic Reboot: Restart Your Computer
Sometimes, an I/O error is just a temporary hiccup. A simple restart can clear transient glitches, refresh system resources, and re-establish proper communication channels. It's often overlooked but surprisingly effective. Give your system a full shutdown and restart.
2. Cable Check-Up: Inspecting Connections and Ports
This is the most common and easiest fix. Don't underestimate the power of a good connection.
- Examine Cables: Visually inspect your SATA or USB cables for any signs of damage: bends, kinks, fraying, or exposed wires. If you see anything suspicious, replace the cable. They're inexpensive.
- Secure Connections: Disconnect and firmly re-connect both ends of the cable – where it plugs into the drive and where it plugs into your computer (motherboard for internal drives, USB port for externals). Ensure there's no dust obstructing the ports.
- Switch Ports/Cables:
- For external drives/USBs: Try a different USB port on your computer, preferably one directly on the motherboard (rear ports for desktops) rather than front-panel ports or USB hubs, which can sometimes be less reliable.
- For all drives: If you have a spare cable, try swapping it out.
- Test on Another PC: If possible, connect the problematic drive to a different computer. If it works there, the issue is likely with your original PC's ports, drivers, or system, not the drive itself.
3. Driver Deep Dive: Update or Reinstall Device Drivers
Outdated or corrupted drivers are a frequent culprit. Your drivers are the translators between your Windows OS and your hardware.
- Windows Updates First: Windows Update often includes critical driver updates. Navigate to
Settings > Windows Updateand check for any pending updates. Install them and restart your PC. - Manual Update via Device Manager:
- Press
Windows Key + R, typedevmgmt.msc, and press Enter to open Device Manager. - Expand "Disk Drives" to see your connected storage devices.
- Right-click on the problematic drive (it might be listed with a yellow exclamation mark or as an "Unknown device").
- Select "Update driver," then "Search automatically for drivers." Windows will try to find the best available driver online.
- If Windows doesn't find a newer driver, visit the device manufacturer's official website (e.g., Western Digital, Seagate, Samsung) and download the latest drivers specifically for your drive model and Windows version.
- Reinstall the Driver: If updating doesn't work, reinstalling can often resolve corruption.
- In Device Manager, right-click the problematic drive and select "Uninstall device."
- Confirm the uninstallation.
- Restart your computer. Windows should automatically detect the drive and reinstall a generic or previously installed driver. If not, manually "Scan for hardware changes" in Device Manager (Action menu).
4. System File Scrutiny: Run SFC and DISM
Corrupted Windows system files can indirectly affect how your OS handles storage devices. The System File Checker (SFC) and Deployment Image Servicing and Management (DISM) tools can repair these issues.
- Open Terminal/Command Prompt as Administrator: Search for "cmd" or "terminal" in the Start Menu, right-click, and select "Run as administrator."
- Run DISM First: Type
DISM /online /cleanup-image /restorehealthand press Enter. This command uses Windows Update to fix any corrupted system files in the Windows image. It requires an internet connection and can take some time. - Run SFC: Once DISM completes, type
sfc /scannowand press Enter. This command scans for and repairs corrupted Windows system files.
After both commands complete, restart your computer and check if the I/O error persists.
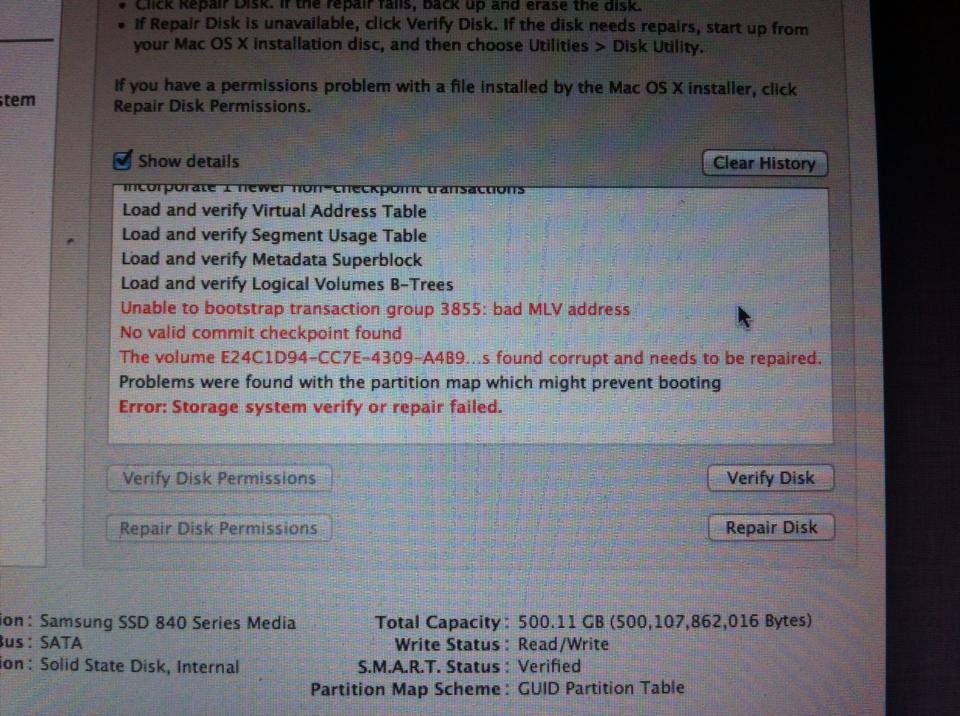
5. S.M.A.R.T. Status: Reading Your Drive's Health Report
This is a critical diagnostic step, especially for HDDs and SSDs. S.M.A.R.T. (Self-Monitoring, Analysis, and Reporting Technology) is a monitoring system built into most modern drives that reports on various reliability indicators. You'll need a third-party tool like CrystalDiskInfo, Hard Disk Sentinel, or similar to access this report.
What to Look For:
Pay close attention to attributes related to sector health and reallocations. While specific S.M.A.R.T. attributes vary, here are some common ones and what they indicate:
05: Reallocated Sectors Count: The number of sectors that have been remapped due to errors. Any non-zero value here (especially in triple digits or higher) indicates the drive is finding and trying to work around bad sectors.C4: Reallocation Event Count: The total number of remapping operations.C5: Current Pending Sector Count: The number of unstable sectors waiting to be remapped. A growing count here is a red flag.C6: Uncorrectable Sector Count: The number of sectors that could not be corrected. This is a very serious warning.0A: Spin Retry Count(HDDs only): The number of times the drive motor had to retry to spin up. High values suggest motor issues.
Action Plan Based on S.M.A.R.T.:- Triple Digits or More on Critical Attributes (05, C4, C5, C6): The Drive is Failing!
- Immediate Action: Stop using the drive immediately. Continued use can lead to further degradation and permanent data loss.
- Recommendation: If data recovery was not already performed, this is your last chance for professional data recovery services. Do not attempt further fixes yourself, as they could make data unrecoverable.
- Double Digits or Below on Critical Attributes (05, C4, C5, C6): Proceed with Caution.
- Recommendation: While the drive might still function, it's showing signs of wear. You can attempt a full format (which will irrevocably erase all data) and continue using it for non-critical tasks, but replacing the drive very soon is highly recommended. It's a ticking time bomb.
6. Initializing the Disk (for "Unknown/Not Initialized" Drives - Only After Data Recovery)
If your drive appears as "Unknown" or "Not Initialized" in Disk Management, you might need to initialize it. WARNING: This process will erase ALL data on the selected disk. Only proceed if you have successfully recovered your data or if the drive is brand new and empty.
Using DiskPart (a powerful command-line tool):
- Open Terminal or Command Prompt as administrator.
- Type
diskpartand press Enter. - Type
list diskand press Enter. Carefully identify your problematic disk by its size. This step is critical to avoid erasing the wrong drive. - Type
select disk #(replace#with the correct disk number) and press Enter. - Type
cleanand press Enter. This command removes all partition and volume information. - Type
convert gpt(for modern systems and large drives) orconvert mbr(for older systems or smaller drives) and press Enter. - Type
create partition primaryand press Enter. - Type
format quick fs=ntfs(for Windows compatibility) orformat quick fs=fat32(for wider compatibility with older devices/OSes, but with file size limits) and press Enter. A "quick" format is usually sufficient. - Type
assignand press Enter to assign a drive letter. - Type
exitto close DiskPart, thenexitagain to close Command Prompt.
Check File Explorer to see if your drive is now accessible.
7. Formatting the Hard Drive (for "RAW" Drives - Only After Data Recovery)
If your drive appears as "RAW" (meaning Windows doesn't recognize its file system) and initialization didn't help, formatting is the next step. WARNING: Formatting will erase ALL data on the selected disk. Ensure your data is safe before proceeding.
You have a few options for formatting:
- Option 1: Disk Management:
- Right-click the Start button and choose "Disk Management."
- Locate the RAW drive, right-click it, and select "Format..."
- In the dialog box, give it a volume label (a name), choose a file system (NTFS for most Windows uses, FAT32 for wider compatibility but file size limits), and ensure "Perform a quick format" is checked.
- Click "OK" and confirm the warning.
- Option 2: File Explorer:
- Open File Explorer (Windows Key + E).
- Find the inaccessible drive (it might appear without a drive letter or with a generic icon), right-click it, and choose "Format..."
- Follow the same steps as in Disk Management: set volume label, file system, and perform a quick format.
- Option 3: Third-Party Partition Manager: Tools like MiniTool Partition Wizard offer more robust formatting options and can sometimes handle drives that Windows struggles with.
- Install and open the partition manager.
- Select the partition on your RAW drive.
- Choose the "Format Partition" option.
- Specify the volume label and file system, then apply the changes.
After formatting, the drive should appear as a usable volume in File Explorer.
8. When All Else Fails: Replacing the Disk
If, after trying all the above steps, your drive remains RAW, inaccessible, unformattable, or if the S.M.A.R.T. status indicates severe failure, it's time to face the music: the drive is likely beyond repair.
- New Drives: If it's a relatively new drive, check its warranty. Manufacturers often offer replacements for faulty devices.
- Old Drives: For older drives that have simply reached the end of their lifespan, the best course of action is to replace them with a new, reliable storage device. Recycle or safely dispose of the failed drive, ensuring sensitive data is securely wiped if necessary.
Remember, even if a drive seems "fixed" after experiencing I/O errors, especially those stemming from physical damage or bad sectors, its reliability has been compromised. Do not trust it with mission-critical data.
Building Long-Term Resilience: Beyond the Fix
Resolving an I/O error is a temporary victory if you don't learn from the experience. Here are some enduring recommendations to protect your data and prevent future headaches:
- Regular Backups Are Non-Negotiable: This is the golden rule of data management. Whether you use cloud storage (OneDrive, Google Drive, Dropbox), an external hard drive, or a Network Attached Storage (NAS) device, regularly back up your important files. If your drive unexpectedly fails, you'll be grateful you have a recent copy. For crucial information, consider implementing a 3-2-1 backup strategy: three copies of your data, on two different media types, with one copy offsite.
- Replace Unreliable Drives: If a drive has shown signs of an I/O error, especially related to physical damage or numerous bad sectors (as revealed by S.M.A.R.T. reports), its integrity is compromised. Even if you manage to format and reuse it, its reliability is questionable. Retire it from critical duties and invest in a new, stable storage device.
- Handle Drives with Care: Physical shock is a major enemy of HDDs and even affects SSDs. Always handle external drives gently, and ensure internal components are securely mounted.
- Eject Safely: Always use the "Safely Remove Hardware and Eject Media" option for USB drives and external HDDs before disconnecting them. This ensures all write operations are complete and prevents file system corruption.
- Keep Drivers Updated: Regularly check for Windows updates and, if you have specific hardware, occasionally check the manufacturer's website for updated drivers.
By understanding the causes, carefully following diagnostic steps, prioritizing data recovery, and adopting sound long-term practices, you can confidently tackle I/O errors and safeguard your digital life. While it can be frustrating to see such an error, the good news is that many solutions are within your grasp. For more general troubleshooting advice on storage device issues, you might find our guide on Troubleshooting I/O Device Errors to be a valuable resource.