An I/O device error is more than just a cryptic message; it's a digital roadblock that stops you dead in your tracks, preventing access to your crucial files. When your computer flashes that dreaded "Location is not available. Disk is not accessible. The request could not be performed because of an I/O device error," it's telling you it can't read or write data to a storage device. This isn't just a minor glitch; it's a serious warning that demands a strategic response. Your goal, above all else, should be data recovery, preserving your important documents, photos, and projects before attempting any repairs.
At a Glance: Your Quick Data Recovery & Repair Checklist
- STOP immediately: Avoid further operations on the affected drive.
- Prioritize recovery: Use specialized software to extract your data before any repair attempts.
- Save safely: Always save recovered files to a different, healthy storage device.
- Check connections: Loose cables are a common, easy fix.
- Update drivers: Outdated software can cause I/O issues.
- Scan for errors: Tools like CHKDSK can fix logical file system problems.
- Clean up malware: Viruses can corrupt disk access.
- Consider professional help: For physical damage, leave it to the experts.
- Backup, backup, backup: Prevent future data loss from similar incidents.
Decoding the I/O Device Error: What's Really Going On?
The "I/O device error" is a broad alert from your operating system (typically Windows) that it's struggling with an Input/Output operation. In simpler terms, your computer tried to talk to a storage device – be it an internal hard drive (HDD), a speedy solid-state drive (SSD), an external USB drive, an SD card, or even an older CD/DVD – and that conversation failed. This often surfaces when you're trying to open a file, initialize a new disk, format a drive, or just copy data.
Understanding the root cause is crucial for effective troubleshooting, but remember, data recovery always comes first. You wouldn't try to fix a burning house before rescuing the people inside, right? The same principle applies here.
Let's quickly survey the common culprits:
- Connection Problems: This is often the simplest fix. Think loose USB cables, damaged SATA connections, a faulty USB port, or even interference from other connected devices (crosstalk).
- Driver Dysfunction: Your computer relies on drivers to communicate with hardware. If these drivers are old, corrupted, or incompatible, they can break the I/O communication chain.
- Disk Damage (Logical & Physical): This is where things get more serious. Logical errors include file system corruption (the "map" of your data is scrambled) or bad sectors (small areas on the disk that have become unreadable). Physical damage means the drive itself is mechanically failing.
- Hardware Failure: Beyond simple disk errors, the drive's internal components might be failing, or the computer's motherboard/controller could be at fault.
- Software Skirmishes: Sometimes, background programs or conflicting software can interfere with disk operations.
- Malware Menace: Viruses and other malicious software can corrupt system files or intentionally block access to drives.
- Incorrect Transfer Mode: Your operating system might be trying to communicate with the drive using an incompatible data transfer mode.
- Drive Letter Dilemma: In rare cases, a conflict in assigned drive letters can confuse the system.
Each of these causes points to a different solution, but the immediate priority remains universal: secure your data.
Your First and Most Important Step: Prioritizing Data Recovery
When faced with an I/O error, the knee-jerk reaction might be to immediately run diagnostic tools or try to format the drive. Resist this urge! Any repair attempt, especially those involving file system checks or formatting, carries an inherent risk of further data loss, particularly if the drive has serious underlying issues or bad sectors.
Think of it like an emergency room triage: you stabilize the patient (recover data) before performing surgery (attempting repairs). Data recovery software works by attempting to read raw data directly from the drive, often bypassing the corrupted file system, to retrieve as much information as possible.
How to Safely Recover Your Files with Dedicated Software
This process requires a specialized data recovery tool. Several reputable options exist, such as MiniTool Power Data Recovery or iBoysoft Data Recovery, which are designed to handle scenarios like I/O errors.
Here's a step-by-step guide:
- Download and Install: Visit the official website of your chosen data recovery software and download the installation file. Crucially, install the software on a different drive than the one experiencing the I/O error. Installing it on the problematic drive could overwrite data you're trying to recover.
- Launch the Software: Once installed, open the application. You'll typically be greeted with an intuitive interface listing all detected storage devices.
- Select the Problematic Disk: Carefully identify and select the drive or partition that's showing the I/O error. It might appear with its drive letter or as an "unallocated" or "unknown" partition. If you're unsure, double-check its size and capacity.
- Initiate a Thorough Scan: Start the scanning process. Most software offers different scan modes. For I/O errors, a "Deep Scan" or similar comprehensive option is usually recommended. This mode performs a sector-by-sector scan, meticulously searching for recoverable data fragments. Be prepared for this to take a significant amount of time, depending on the drive's size and condition.
- Browse and Preview Files: As the scan progresses (or once it completes), the software will list files it has found. These often include deleted, lost, and even existing files that were part of the corrupted file system. Use the software's filtering options (by file type, date, size) or search function (by keyword) to pinpoint your most critical files. Many tools also offer a preview function, allowing you to verify the integrity of documents, photos, or videos before recovery.
- Save Your Recovered Files to a New Location: This step is vital. Select all the files you wish to save. When prompted to choose a destination, always select a different, healthy storage device. This could be another internal drive, an external HDD, a large USB flash drive, or cloud storage. Never save the recovered files back to the original problematic disk, as this can overwrite existing data and make further recovery attempts impossible.
Important Note on Free Editions: Some data recovery software offers free versions with data recovery limits (e.g., MiniTool Power Data Recovery's free edition allows up to 1 GB). If you have more data to recover, you might need to upgrade to a paid version.
Fixing the I/O Device Error: Post-Recovery Repair Strategies
Once your critical data is safely recovered and stored elsewhere, you can breathe a little easier and begin troubleshooting the I/O error itself. These solutions range from simple connectivity checks to more advanced file system repairs, and in some cases, even formatting the drive.
1. The Simple Fix: Check Your Cables and Connections
A surprising number of I/O errors stem from basic connectivity issues. Don't underestimate this step.
- Secure All Cables: For internal drives, ensure SATA data and power cables are firmly seated at both the drive and the motherboard. For external drives, check the USB cable at both the drive and the computer.
- Swap Cables and Ports: If the cables seem fine, try using different cables. A faulty cable can easily cause I/O issues. Similarly, try plugging external drives into different USB ports on your computer, or even connect the drive to an entirely different computer to rule out a faulty port on your primary machine.
- Reduce Interference: Disconnect any non-essential external devices. Sometimes, "crosstalk" or power conflicts from other peripherals can interfere with a specific drive.
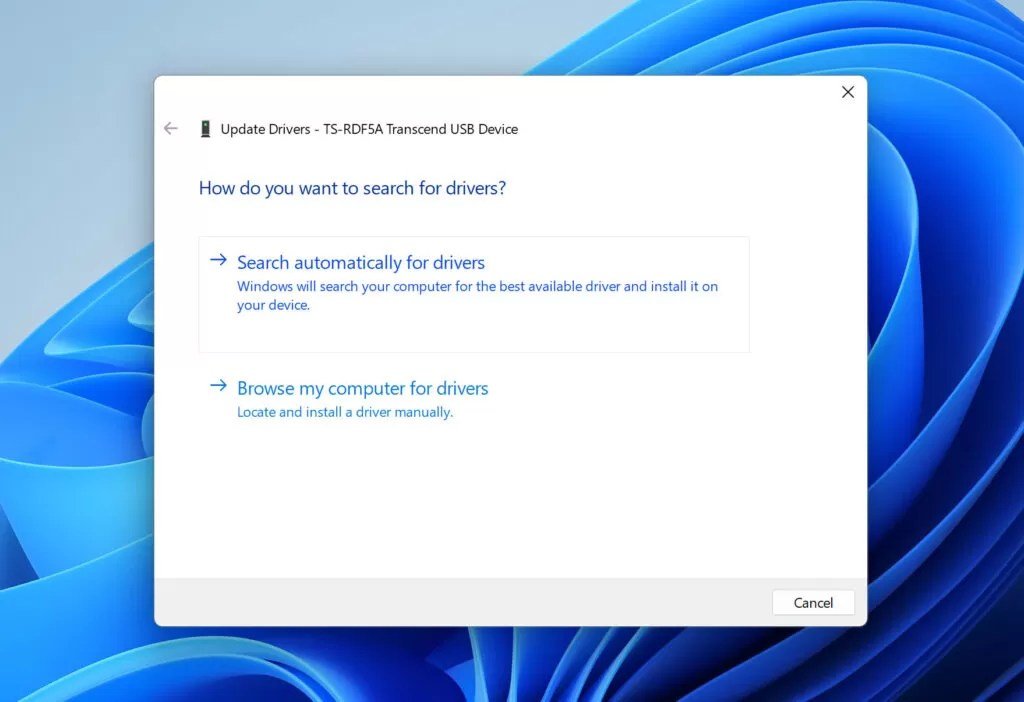
2. Driver Tune-Up: Update or Reinstall Disk Drivers
Outdated or corrupted drivers are a common cause of hardware communication errors.
- Via Device Manager:
- Press
Windows key + Xand select "Device Manager." - Expand "Disk drives."
- Right-click on the problematic disk (it might appear with a warning icon) and select "Update driver."
- Choose "Search automatically for drivers." If Windows finds a newer driver, install it.
- If updating doesn't help, try right-clicking the disk again and selecting "Uninstall device." Do NOT check the box to delete driver software. Restart your computer. Windows will usually reinstall the driver automatically upon reboot.
- Via Windows Update:
- Go to
Settings > Update & Security > Windows Update. - Click "View optional updates."
- Look for "Driver updates" and install any available updates related to your storage controllers or the problematic disk.
3. File System First Aid: Check and Repair Logical Errors
If your cables and drivers are in order, the next likely culprit is a corrupted file system or logical bad sectors. Windows has built-in tools for this.
- Using the Error-Checking Tool (File Explorer): This is a user-friendly graphical option.
- Open File Explorer (Windows Key + E) and navigate to "This PC."
- Right-click on the problematic disk (if it's still visible) and select "Properties."
- Go to the "Tools" tab.
- Under "Error-checking," click "Check." Follow the prompts to scan and attempt to repair any detected errors.
- The Power of CHKDSK (Command Prompt): For a more robust check, especially for serious file system corruption, the
chkdskcommand is invaluable.
- Type
cmdin the Windows search bar, right-click on "Command Prompt," and select "Run as administrator." - In the Command Prompt window, type
chkdsk [drive letter]: /f(replace[drive letter]with the actual letter of your problematic drive, e.g.,chkdsk G: /f) and press Enter. - The
/fparameter instructs CHKDSK to find and fix logical errors on the disk. This might take a while. - A Note on
/r: You might see suggestions to usechkdsk [drive letter]: /r. While/rdoes locate bad sectors and attempts to recover readable information, it's a more aggressive command that carries a higher risk of data loss on those bad sectors as it attempts to move data. Use/ffirst, and only consider/rif/ffails and you've already recovered all possible data.
- Third-Party Partition Managers: Tools like MiniTool Partition Wizard also offer "Check File System" features that can identify and repair logical errors, sometimes with a more user-friendly interface than CHKDSK.
4. Isolate Software Conflicts: Perform a Clean Boot
If the I/O error occurs inconsistently or after installing new software, a conflict might be to blame. A clean boot starts Windows with a minimal set of drivers and startup programs, helping you isolate the culprit.
- Search for
MSConfigand open "System Configuration." - Go to the "Services" tab. Check "Hide all Microsoft services" and then click "Disable all."
- Go to the "Startup" tab and click "Open Task Manager."
- In Task Manager, disable every startup item by right-clicking each one and selecting "Disable."
- Close Task Manager, click "OK" in System Configuration, and restart your computer.
- If the I/O error is resolved in this state, it means a conflicting program or service was the cause. You can then re-enable services and startup items one by one to find the specific troublemaker.
5. Combat Malware and Viruses
Malicious software can wreak havoc on your system, including interfering with disk operations and causing I/O errors.
- Connect the external drive (if applicable) and perform a full system scan using your trusted antivirus software. If you don't have one, Windows' built-in "Virus & Threat Protection" tool is a good starting point.
- Allow the antivirus to quarantine or remove any detected threats.
- Restart your computer and then reconnect the drive to see if the error persists.
6. Adjust Hard Drive Transfer Mode
Sometimes, an incompatible data transfer mode can prevent proper communication.
- Open "Device Manager."
- Expand "IDE ATA/ATAPI controllers."
- Right-click on the relevant IDE channel (often "Primary IDE Channel" or "Secondary IDE Channel," especially for older external drives) and select "Properties."
- Go to the "Advanced Settings" tab.
- Under "Transfer Mode" for "Device 0" (and "Device 1" if present), select "PIO Only."
- Click "OK" and restart your computer. If this fixes the issue, you can try changing it back to "DMA if available" later to see if it still works, as DMA is generally faster.
7. Resolve Drive Letter Conflicts
Rarely, an I/O error can be caused by Windows assigning an conflicting drive letter.
- Right-click the Start menu and select "Disk Management."
- Locate the problematic volume (it might appear without a letter or with an unusual one).
- Right-click on it and select "Change Drive Letter and Paths."
- Click "Change" and choose a new, unused drive letter from the dropdown list.
- Confirm your selection and see if the drive becomes accessible.
8. The Last Resort (Software-wise): Formatting the Disk
If all other software-based solutions fail, and you've successfully recovered your data, formatting the disk might be the only way to make it usable again. This will erase ALL data on the disk.
- Confirm Data Recovery: Absolutely ensure you have recovered every single important file from the drive before proceeding.
- Methods to Format:
- File Explorer: Open File Explorer, right-click the problematic disk (if visible), and select "Format." Choose a file system (NTFS for Windows, exFAT for cross-platform), give it a volume label, and select "Quick Format."
- Disk Management: Open Disk Management, right-click the problematic volume, and select "Format."
- Third-Party Tools: Software like MiniTool Partition Wizard also provides robust formatting options.
- Full vs. Quick Format: A Quick Format primarily rebuilds the file system table. A Full Format (uncheck "Quick Format") also scans for bad sectors and attempts to zero-fill the drive, which takes much longer but can sometimes resolve persistent logical issues.
9. When All Else Fails: Seek Professional Help
If you've exhausted all software-based solutions and the drive still shows I/O errors, it's highly probable that your storage device has suffered a physical hardware failure. This is where you draw the line: do NOT attempt to open or physically repair the drive yourself.
- Disk Maintenance Center: Pack up your drive and take it to a reputable disk repair or data recovery technician. They have specialized tools and cleanroom environments necessary to diagnose and potentially repair physical damage, or recover data from failing components.
- Warranty Check: If the drive is still under warranty, contact the manufacturer. They might offer a replacement, though data recovery might not be included.
For a broader understanding of how to approach these kinds of issues, you might find our guide on Troubleshooting i/o device errors to be a valuable resource.
Proactive Defense: The Best Data Recovery Strategy
The truth is, the very best data recovery strategy is one you implement before disaster strikes. An I/O device error is a stark reminder of how fragile digital data can be.
- Regular Backups: Implement a robust backup strategy. Use cloud services (OneDrive, Google Drive, Dropbox), external hard drives, or Network Attached Storage (NAS) to regularly back up your critical files. Automate this process whenever possible.
- Monitor Drive Health: Pay attention to unusual noises from mechanical drives (clicking, grinding), slow performance, or frequent errors, which can be early warning signs of impending failure. Use S.M.A.R.T. (Self-Monitoring, Analysis, and Reporting Technology) tools to monitor your drive's health status.
- Handle Devices Carefully: Physical damage is a leading cause of drive failure. Handle external drives with care, avoid dropping them, and always use the "Safely Remove Hardware" option before disconnecting USB devices.
Navigating an I/O device error can be stressful, but by following a methodical approach – prioritizing data recovery, then systematically troubleshooting the error, and finally, embracing preventative measures – you can mitigate potential losses and keep your digital life running smoothly.